Chap.11  计算小白硬学VASP —— 构建slab模型

Chap.11 计算小白硬学VASP —— 构建slab模型

炫酷老司机 Lv99

¡Hola a todos!

本章介绍如何构建slab模型。

首先切面用到的miller index针对的是bulk模型的惯用胞(conventional cell)而不是原胞(primtive cell),这与之前计算能带是刚好相反的。

所以,在进行切面操作时,要确保你的bulk模型是惯用胞,可以用pymatgen的功能来帮助实现。

  • 直接从Materials project下载结构

如果是从MP上下载结构,我们需要把conventional_cell = True打开:

1
2
3
4
5
6
7
from mp_api.client import MPRester

api_key = "your key"

with MPRester(api_key) as mpr:
Si = mpr.get_structure_by_material_id("mp-149",conventional_unit_cell=True)
Si.to(filename="./Si_conventional.cif")

这样确保你下载的结构是惯用胞。

  • 原胞转化为惯用胞

也可以通过转化来确保使用的是惯用胞:

1
2
3
4
5
6
7
8
9
from pymatgen.core.structure import Structure
from pymatgen.symmetry.analyzer import SpacegroupAnalyzer

structure = Structure.from_file("./Si_primtive.cif")
analyzer = SpacegroupAnalyzer(structure)
print(f'old structure: \n {structure}')
print('\n')
new_structure = analyzer.get_conventional_standard_structure()
print(f'new structure: \n {new_structure}')

new_structure对应的就是惯用胞结构。运行代码:

1
2
3
4
5
6
7
8
9
10
11
12
13
14
15
16
17
18
19
20
21
22
23
24
25
26
27
28
29
30
old structure: 
Full Formula (Si2)
Reduced Formula: Si
abc : 3.849278 3.849279 3.849278
angles: 60.000012 60.000003 60.000011
pbc : True True True
Sites (2)
# SP a b c
--- ---- ----- ----- -----
0 Si 0.875 0.875 0.875
1 Si 0.125 0.125 0.125


new structure:
Full Formula (Si8)
Reduced Formula: Si
abc : 5.443702 5.443702 5.443702
angles: 90.000000 90.000000 90.000000
pbc : True True True
Sites (8)
# SP a b c
--- ---- ---- ---- ----
0 Si 0.75 0.75 0.25
1 Si 0 0.5 0.5
2 Si 0.75 0.25 0.75
3 Si 0 0 0
4 Si 0.25 0.75 0.75
5 Si 0.5 0.5 0
6 Si 0.25 0.25 0.25
7 Si 0.5 0 0.5

或者你不知道自己的结构到底是原胞还是惯用胞,可以无脑直接转换,因为对于本身就是惯用胞的结构,get_conventional_standard_structure()方法不会修改本身的信息:

1
2
3
4
5
6
7
8
9
10
from pymatgen.core.structure import Structure
from pymatgen.symmetry.analyzer import SpacegroupAnalyzer

# 读取本身是惯用胞的结构
structure = Structure.from_file("./Si_conventional.cif")
analyzer = SpacegroupAnalyzer(structure)
print(f'old structure: \n {structure}')
print('\n')
new_structure = analyzer.get_conventional_standard_structure()
print(f'new structure: \n {new_structure}')

结果不变,运行代码:

1
2
3
4
5
6
7
8
9
10
11
12
13
14
15
16
17
18
19
20
21
22
23
24
25
26
27
28
29
30
31
32
33
34
35
36
old structure: 
Full Formula (Si8)
Reduced Formula: Si
abc : 5.443702 5.443702 5.443702
angles: 90.000000 90.000000 90.000000
pbc : True True True
Sites (8)
# SP a b c
--- ---- ---- ---- ----
0 Si 0.75 0.75 0.25
1 Si 0 0.5 0.5
2 Si 0.75 0.25 0.75
3 Si 0 0 0
4 Si 0.25 0.75 0.75
5 Si 0.5 0.5 0
6 Si 0.25 0.25 0.25
7 Si 0.5 0 0.5


new structure:
Full Formula (Si8)
Reduced Formula: Si
abc : 5.443702 5.443702 5.443702
angles: 90.000000 90.000000 90.000000
pbc : True True True
Sites (8)
# SP a b c
--- ---- ---- ---- ----
0 Si 0.25 0.75 0.75
1 Si 0 0 0
2 Si 0.25 0.25 0.25
3 Si 0 0.5 0.5
4 Si 0.75 0.75 0.25
5 Si 0.5 0 0.5
6 Si 0.75 0.25 0.75
7 Si 0.5 0.5 0

Note:上述方法对于缺陷结构和掺杂结构,由于对称性无法识别可能无法转化。

SlabGenerator模块

进入正题,切面主要用到pyamtgenSlabGenerator模块,首先导入它:

1
from pymatgen.core.surface import SlabGenerator

然后需要先实例化SlabGenetator,才能调用里面的切面方法:

1
2
3
4
5
6
7
8
9
10
11
12
13
14
15
16
from pymatgen.core.surface import SlabGenerator
from pymatgen.core.structure import Structure

Si = Structure.from_file("./Si_conventional.cif")

# 实例化
slabgen = SlabGenerator(
initial_structure=Si, # 初始结构
miller_index=(1, 1, 1), # 指定晶面
min_slab_size=15, # slab厚度
min_vacuum_size=20, # 真空层厚度
in_unit_planes=False, # 切换 min_slab_size & min_vacuum_size
center_slab=True, # slab模型居中
primitive=True, # 使用最小切面结构
reorient_lattice=True, # 重定向晶格
)

这里着重介绍in_unit_planesprimitive参数。

  • in_unit_planes:影响min_slab_sizemin_vacuum_size的数值,默认为False

    • 当为False时,min_slab_sizemin_vacuum_size对应的单位为Angstrom ,即上述分别表示slab厚度为10埃,真空层厚度为15埃;

    • 当为True时,数值为切面的层数,如此时min_slab_sizemin_vacuum_size都设置为3,表示slab厚度和真空层厚度为(1,1,1)面最小重复单元乘以3。需要注意的是,此时数字3并不等于原子层数,且不同晶面的最小重复单元的厚度不一样,如Si的(1,1,1)面单层厚度是小于(1,0,0)面的。

  • primitive:默认为True。该参数跟primitive cell没有关系,在这里是决定slab结构是否选取最小单元。当设置为True时,如1x1x1的Si惯用胞结构和3x3x3超胞的Si惯用胞结构,最后得到的slab结构是一样。

SlabGenerator下面有许多切面的方法,下面一一介绍。

get_slab()方法

get_slab()方法用于生成指定暴露面原子的slab结构,传入shift参数来指定原子。该方法不建议直接使用,前提你需要确定shift的值。对于垂直于坐标轴的切面,shift值对应的分别就是abc的坐标,但是其他晶面情况就需要简单的运算之后才能够得到shift值。代码如下:

1
2
3
4
5
6
7
8
9
10
11
12
13
14
15
16
17
18
19
from pymatgen.core.surface import SlabGenerator
from pymatgen.core.structure import Structure

Si = Structure.from_file("./Si_conventional.cif")

slabgen = SlabGenerator(
initial_structure=Si,
miller_index=(1, 1, 1),
min_slab_size=15,
min_vacuum_size=20,
in_unit_planes=False,
center_slab=True,
primitive=True,
reorient_lattice=True,
)
# 生成表面
slab = slabgen.get_slab(shift=0)
# 保存结构
slab.to("./Si_111_getslab.cif")

vesta里面查看结构:

image-20240805095256547

slab厚度和真空层厚度可根据上述方法自行调整。

get_slabs()方法

get_slabs()支持生成所有符合要求的slab,接受传入的参数也要比gen_slab()多,主要有:

  • bonds:设置成键范围。通俗的讲就是保护指定原子键对,避免断键。如LiFePO4中要保护PO4基团不被切断键,可以设置bonds={(“P”, “O”): 3},这样就告诉pymatgen,3埃范围内的P原子和O原子维持成键,切面时就会避开PO4断键了。
  • max_broken_bonds:自动切表面时,最大断键数,默认为0。建议不要主动设置,对于复杂结构,会导致切出的slabs数量急增。
  • repair:自动补齐暴露面断键原子,默认False。也建议不要设置,会生成许多不可理的结构。
1
2
3
4
5
6
7
8
9
10
11
12
13
14
15
16
17
18
19
20
21
22
from pymatgen.core.surface import SlabGenerator
from pymatgen.core.structure import Structure

Si = Structure.from_file("./Si_conventional.cif")

slabgen = SlabGenerator(
initial_structure=Si,
miller_index=(1, 1, 1),
min_slab_size=15,
min_vacuum_size=20,
in_unit_planes=False,
center_slab=True,
primitive=True,
reorient_lattice=True,
)
# 生成所有表面
slabs = slabgen.get_slabs()
# 打印结构信息
print([slab for slab in slabs])
# 保存结构
for i, slab in enumerate(slabs):
slab.to(f"Si_111_getslabs_{i}.cif")

运行代码:

1
2
3
4
5
6
7
8
9
10
11
12
13
14
15
16
17
18
19
20
21
22
23
24
25
26
27
28
29
30
31
32
33
34
35
36
37
38
39
[Structure Summary
Lattice
abc : 3.8492788605882793 3.8492788605882797 37.715076344492445
angles : 90.0 90.0 120.00000000000001
volume : 483.9543213850744
A : 3.8492788605882793 0.0 2.3570035178225037e-16
B : -1.9246394302941412 3.333573279519868 2.3570035178225037e-16
C : 0.0 0.0 37.715076344492445
pbc : True True True
PeriodicSite: Si (3.368, 0.2778, 12.18) [0.9167, 0.08333, 0.3229]
PeriodicSite: Si (-0.4812, 2.5, 12.96) [0.25, 0.75, 0.3438]
PeriodicSite: Si (-0.4812, 2.5, 15.32) [0.25, 0.75, 0.4063]
PeriodicSite: Si (1.443, 1.389, 16.11) [0.5833, 0.4167, 0.4271]
PeriodicSite: Si (1.443, 1.389, 18.46) [0.5833, 0.4167, 0.4896]
PeriodicSite: Si (3.368, 0.2778, 19.25) [0.9167, 0.08333, 0.5104]
PeriodicSite: Si (3.368, 0.2778, 21.61) [0.9167, 0.08333, 0.5729]
PeriodicSite: Si (-0.4812, 2.5, 22.39) [0.25, 0.75, 0.5938]
PeriodicSite: Si (-0.4812, 2.5, 24.75) [0.25, 0.75, 0.6563]
PeriodicSite: Si (1.443, 1.389, 25.54) [0.5833, 0.4167, 0.6771],

Structure Summary
Lattice
abc : 3.8492788605882793 3.8492788605882797 37.715076344492445
angles : 90.0 90.0 120.00000000000001
volume : 483.9543213850744
A : 3.8492788605882793 0.0 2.3570035178225037e-16
B : -1.9246394302941412 3.333573279519868 2.3570035178225037e-16
C : 0.0 0.0 37.715076344492445
pbc : True True True
PeriodicSite: Si (1.443, 1.389, 13.75) [0.5833, 0.4167, 0.3646]
PeriodicSite: Si (1.443, 1.389, 11.39) [0.5833, 0.4167, 0.3021]
PeriodicSite: Si (3.368, 0.2778, 16.89) [0.9167, 0.08333, 0.4479]
PeriodicSite: Si (3.368, 0.2778, 14.54) [0.9167, 0.08333, 0.3854]
PeriodicSite: Si (-0.4812, 2.5, 20.04) [0.25, 0.75, 0.5313]
PeriodicSite: Si (-0.4812, 2.5, 17.68) [0.25, 0.75, 0.4688]
PeriodicSite: Si (1.443, 1.389, 23.18) [0.5833, 0.4167, 0.6146]
PeriodicSite: Si (1.443, 1.389, 20.82) [0.5833, 0.4167, 0.5521]
PeriodicSite: Si (3.368, 0.2778, 26.32) [0.9167, 0.08333, 0.6979]
PeriodicSite: Si (3.368, 0.2778, 23.96) [0.9167, 0.08333, 0.6354]]

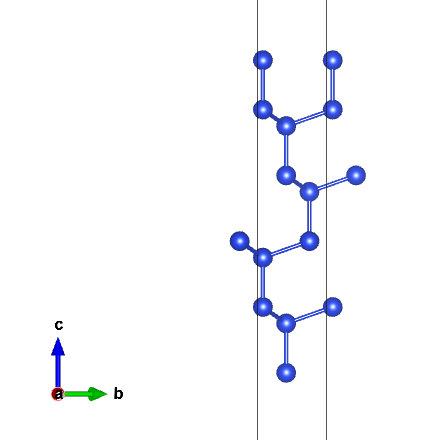
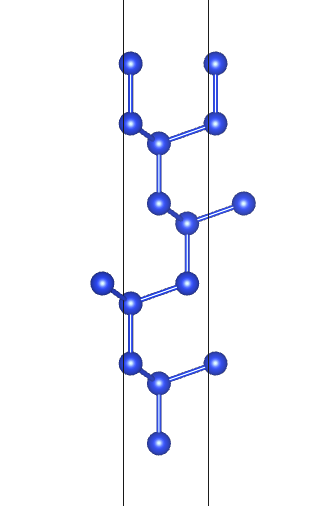
get_slabs()自动切出所有的表面,根据输出信息可以发现根据原子排布不同Si(1,1,1)面有两种暴露面:
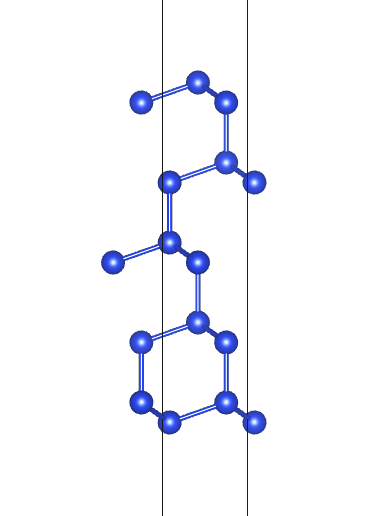
image-20240805102203787

image-20240805102215172

补充

pymatgen切面有时候slabc方向不是正交的,即γ角不为90°。此时可以调用get_orthogonal_c_slab()方法进行矫正即可,用法为直接在slab对象调用即可:

1
2
3
4
5
6
......
# SlabGenerator生成表面
slab = slabgen.get_slab()
# 正交转化
slab.get_orthogonal_c_slab()
print()

¡Muchas gracias!

  • 标题: Chap.11 计算小白硬学VASP —— 构建slab模型
  • 作者: 炫酷老司机
  • 创建于 : 2024-08-05 00:00:00
  • 更新于 : 2024-08-05 10:34:12
  • 链接: https://andyhox.github.io/2024/08/05/Learn-VASP-from-pymatgen-11/
  • 版权声明: 欢迎个人转载、使用、转贴等,但请获得作者同意且注明出处!
目录
Chap.11 计算小白硬学VASP —— 构建slab模型